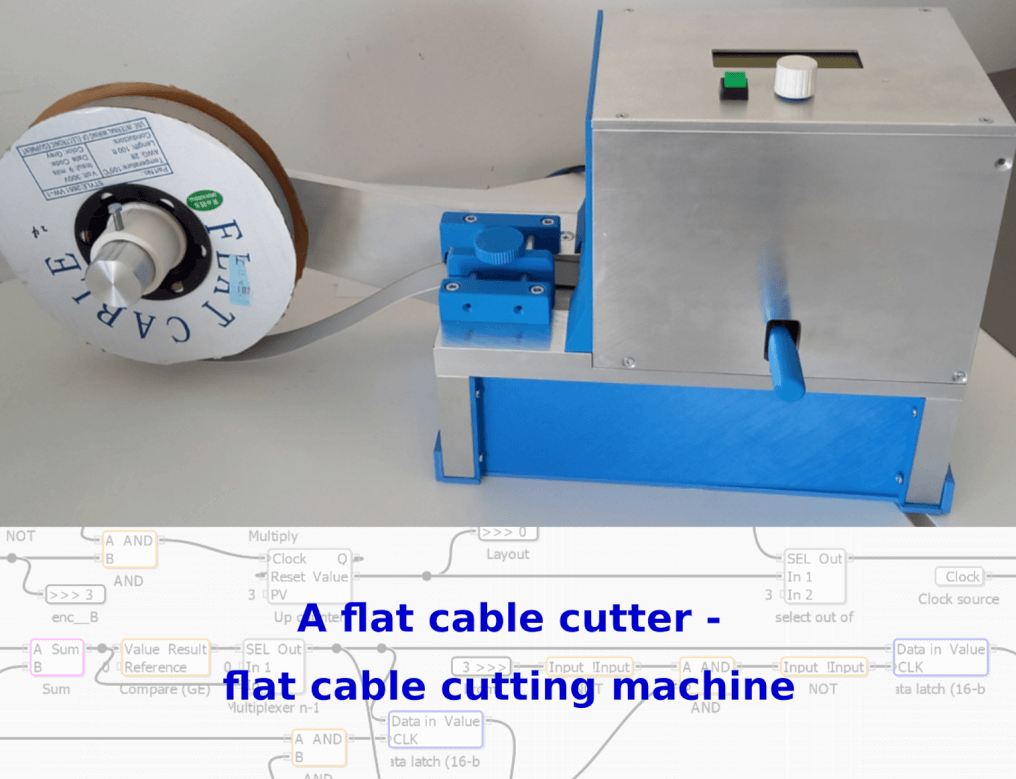
A blog article about a flat cable cutter project from the scratch. From the idea to the useful production machine. Machine was build using a PoKeys57U device from CNC Controllers series and stepper motor driver-complete explanation. Two great products from PoLabs.
Table of Contents
What to watch out for when choosing a flat cable cutter?
On market is a lot of machines or tools which are intended for cutting cables. The right choice of machine or tools is on the customer. The most important things, when choosing a flat cable cutter are:
- accuracy of the machine and cuts,
- repeatability of cuts length,
- Professional design for easy handling,
- Made of special tool steel,
- custom made device for needs
- one of the best flat cable cutters on market (small footprint, fast cutting).
How do you cut a flat cable?
If you work with electronics there is impossible not to deal with flat cables or also called ribbon cables. We can find them almost anywhere. Most likely they are used for buses between different PCB boards. However, for the flat cable cutter, we usually use ordinary office scissors or more professional hand tools which is quite expensive for making just a few parts. In case you occasionally need to make a bigger amount of flat cables that could be time-consuming. Of cores there are flat cable cutting machines on a market but if our main business is not cable production the purchase of such a machine is not economically justified.
Automatic wire cut to length machine
Our development vein did not give us peace of mind not to try to make a cable cutter ourselves. However, our idea was to make an automatic wire cut to length machine with a settable length and number of pieces. The machine should be able to cut up to 32-pin cable. Even more, we wanted a simple HMI – a human-machine interface with basic setting options and easy-to-use it.

Automatic wire cutter project
First, we must say that the project had two areas that needed to be addressed. Mechanical with blade and flat cable feeder and electric with drives and control logic.
Mechanical parts of flat cable cutter
In short, the machine was developed and designed in 3D. That way it is easier to check and make some modifications to machine design. With design and development we want: practical and compact machine for better, faster and easier cutting flat cables for our products.
Technical data
- working width: 50mm,
- max. thickness of cable: 2.5mm,
- length of a machine: 565mm,
- width:216mm,
- height: 267mm,
- weight: 11.30kg

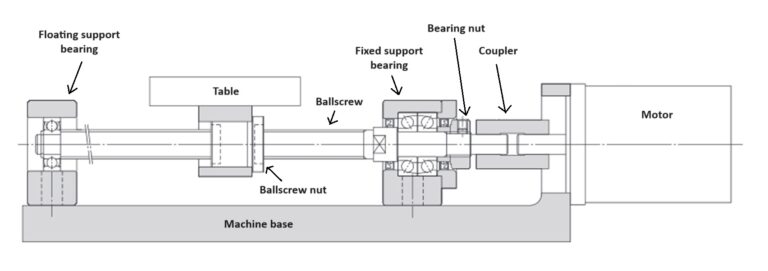
Motion unit
The motion unit is designed simply. We have stepper motor NEMA 23 mounted on a holder, holder has slots that are made for correct tension of a timing belt. As mentioned, we used a pulley for transmission between the motor shaft and the rubberized aluminum roller. Pulleys are connected with the timing belt. Above the driven roller is a pressure roller which has the function to pressure flat cable on the driven roller. The result is: no slipping during cutting.
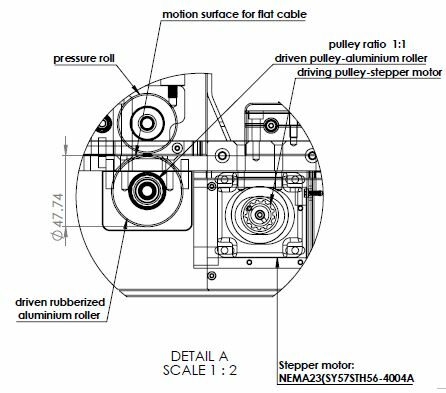
Cutting unit
The cutting unit have a custom-made part. Lower holder for cutting blade and covers, upper holder for the blade, guide pillars and self-lubricating guide bushes.

Electronic parts of flat cable cutting machine
Selecting electronic parts
As Polabs is well known for its wide range of own products and richly stocked online store, we, of course, used units from our store for most electronic components. For the processor unit, we have chosen USB I/O controller from our CNC Controllers products category. We used a USB port only at the developing stage for programming the unit so also appropriate would be Ethernet I/O controller.
Let me mention also the stepper motor driver PoStep60-256 and the universal 4×20 LCD display. To navigate through HMI we have to choose an incremental encoder with a switch and start/stop button. We have chosen a photoelectric sensor for ” Out of cable” detection.
Logic:
- PoKeys57U
- PoStep60-256
- Alphanumeric LCD 4×20
- Incremental encoder with switch (EC12D1564404)
- Photo-electric sensor
- Button
Power :
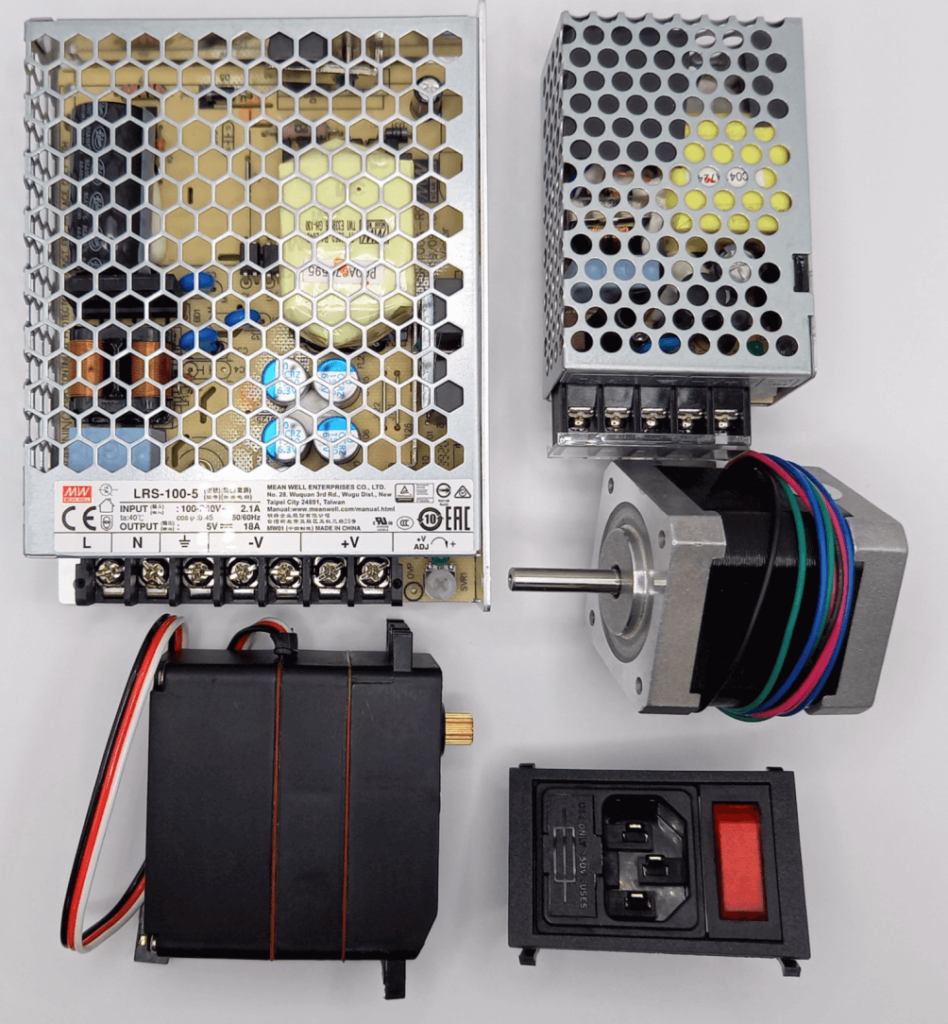
- Stepper motor NEMA 23
- Servo motor TGY-S8166M
- PoPower12-25 12V 25W
- Power supply 5V 100W
- AC supply socket with switch
The servo motor turned out to be quite current consuming so we used 5V/100W power supply for it.
Wiring electronic components
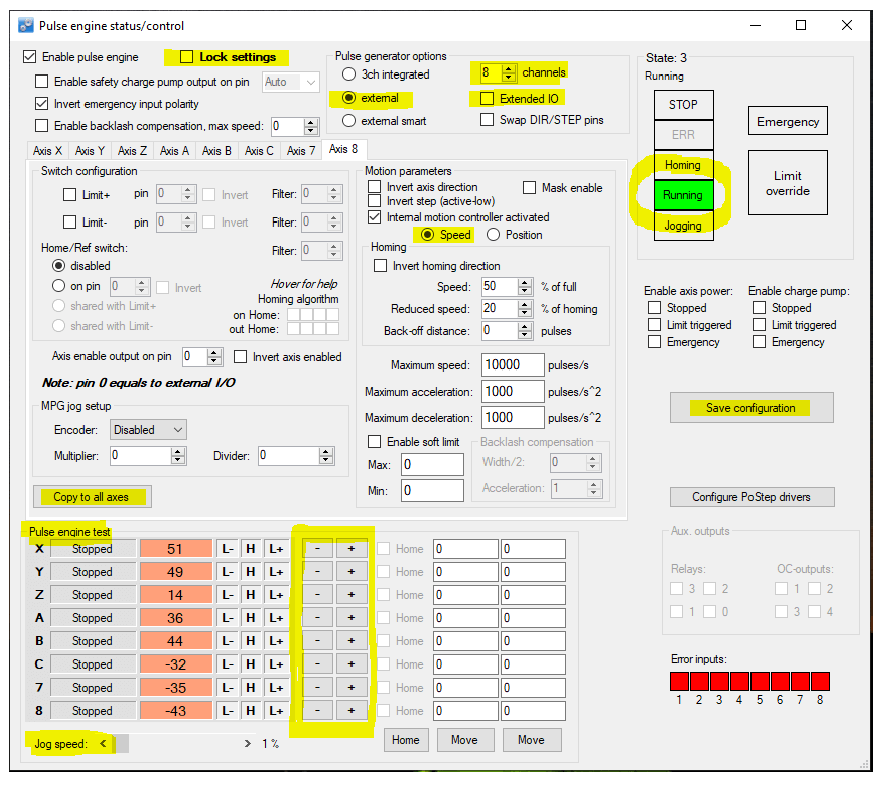
PoKeys57U has 55 digital I/O ports but it supports a wide range of functionality that is available at dedicated pins. So we need to determine those pins first.
We use X-axis pulse engine pins for controlling the stepper motor driver and ultra-fast encoder input. There are also dedicated pins for LCD and PWM output pin that will drive a servo motor. The pinout is shown in the table below.
| Funcionality | PoKeys Pin number |
| Encoder switch -In | 1 |
| Start/Stop button -In | 2 |
| Photo-electric sensor -In | 3 |
| Ultra fast enc. A -In | 8 |
| Ultra fast enc. B -In | 12 |
| Servo motor PWM -Out | 18 |
| LCD D7… D4 | 23 … 26 |
| LCD RW | 28 |
| LCD RS | 29 |
| LCD E | 30 |
| PoStep60 Enable | 35 |
| PoStep60 DIR | 38 |
| PoStep60 STEP | 46 |
There were just a few important details more and we started programming the logic. First, to PoStep60 Pin9 external 5V must be applied that the Enable input is functional. Second, the photo-electric sensor LED diode must be always “on” so we added a serial resistor and wire it on 5V. Sensor output is open collector type. Therefore, we used a pull-up resistor 5k Ohm with a serial resistor 390 Ohm. You can find detailed information about wiring optocoupler in PoKeys User’s manual, page 94.
Programming PK57U device for cutter functionality
We used the PoBlocks application, which is already included in PoKeys setup package to program the logic. The application is a graphical programming software tool, suitable for custom PoKeys configuration.
We will not go into details but anyway I would like to point out a few things. The application offers a wide range of logic, algebra, timing, trigger, memory, control and other blocks. More, you can even write your own custom PoIL block.
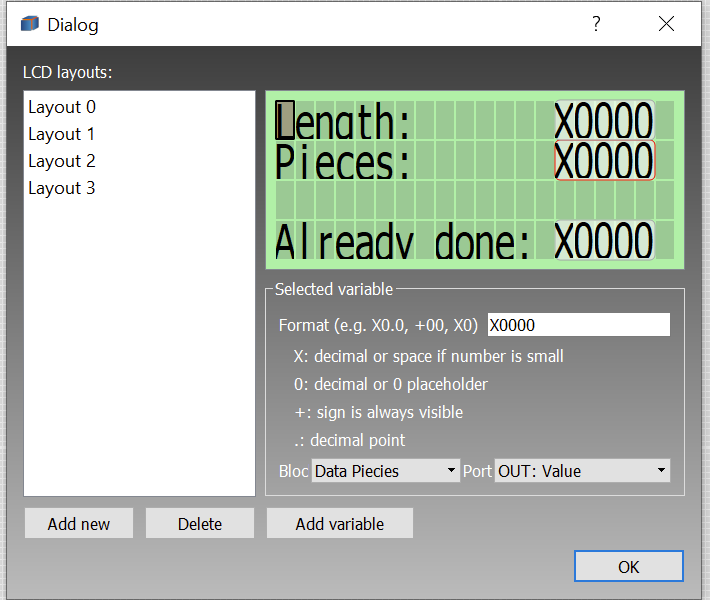
LCD UI block allows configuring 4×20 alphanumerical display with multiple layouts. You can display a text and the selected variable value. All that can be set in the “Dialog” window accessed with a double click on the LCD UI block.
The next thing is how to calculate the number of steps required to move the cable 1 mm. First we need some input data:
- PoStep60-256 micro-stepping setup: 8
- NEMA motor angle per step: 1.8o
- Feed roller diameter: 47.75mm
- Stepper motor to feed roller ratio: 1:1
Cable_length_constant = (pi * 47.75) / ((360o/1.8o )* 8) = 0.09376 mm/step.
Number_Of_Steps = Cable_length / Cable_length_constant
Since we can’t divide by numbers lower than 1 we first multiply the length by 105 and use divider 9376 to calculate the required motor steps.
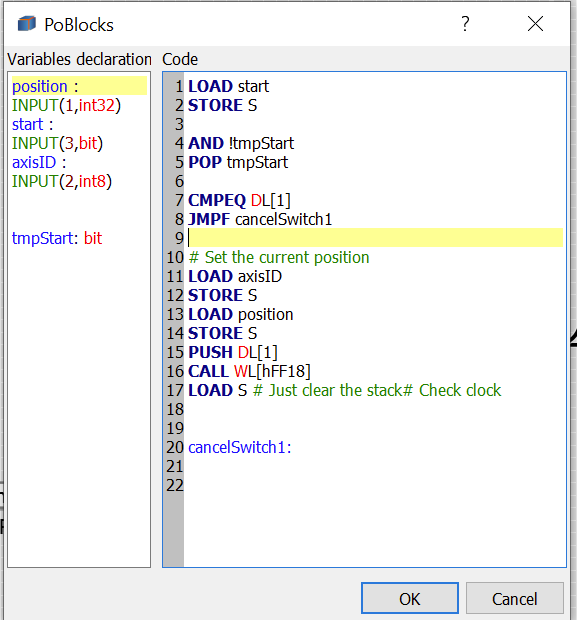
We used the PE Axis Move block and set the parameter Position Mode to True. With Enable ‘1’ and Reference as Number_Of_Steps, PE will generate Step/Dir signal on pin 46/38 until Position is not equal to Reference. We must reset the Position value every time Enable is ‘0’. For this purpose we used a custom block with a code as follows:
Driving the servo motor. First, we tested with PoKeys application and choose Peripherals-> PWM Outputs… We set the PWM period 100 ms and enabled PWM on Pin 18. Then we find a duty cycle at 4% and 12% to be suitable for extreme positions servo motor. These values were then used in PoBlocks to configure the PWM output according to the blade position we wanted to achieve.
The whole logic in PoKeys device
All other logic was built with basic logic blocks such as AND, OR, Multiplexer, and Comparators. Of course, some timers are included for the cable feeding and cutting sequence. Also already mentioned dividers and multipliers.
The final logic looks like that:

First cuts and adjustments
After we assembled the cutter and tried to cut a few pieces of cable, we were amazed at how smooth the cut was. The blade turned out great.
On the other hand, I must mention that we encountered two problems related to the length of the cable. First. The fault turned out to be due to the tolerances of the mechanical components. This was remedied by correcting the number of steps of the stepper motor to move the cable 1 mm.
The other is related to the weight of the cable reel. However, the solution is to set the parameters of the Pulse Engine block. It was necessary to reduce the acceleration and maximum speed. In this way, we limited the slip of the cable on the rubberized aluminum cylinder.
Conclusion
The machine is functional and does its job!
Please check also our latest blog posts. It can help you to improve your machines or get some ideas on how to even make them better
- Homing sensor(blog).
- Bipolar stepper motor driver – PoStep25-256 – product
- PCB tester – for PoStep25-256 – blog
- 4th axis for CNC router – blog
- Introduction to CNC hardware – electronics – blog
- Plasma cutting equipment – blog
- What is CNC plasma cutting – blog
- CNC plasma floating head – blog
- Plasma cutter troubleshooting guide – blog
- Torch height controller-THC
Related Posts