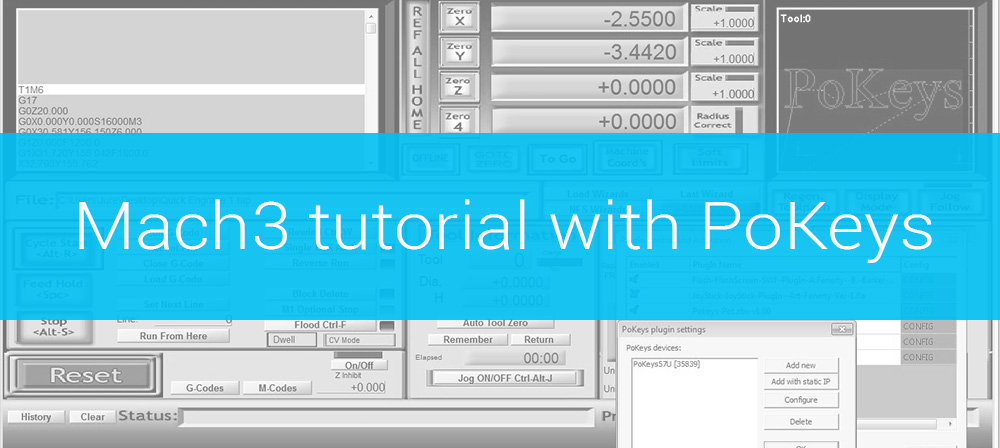
About Mach3 limit switch tutorial
This Mach3 limit switch tutorial will help you to setup all of the switches that can be used on your CNC machines as well as any options that are also connected to the safety of your machine.
Here you can check our USB CNC Controller – PoKeys57CNC
You can find the previous tutorial here.
Why use limit switches?
Limit switches are important for safety of you and your machine. Besides emergency switch (or E-stop for short) these are meant to immediately stop everything and also signal the controller that state. Limit switches can be position on either positive, negative or both sides of the axis travel on your CNC machine. On some machines, limit switches can also be used for homing the machine, eliminating the need for an additional switch.
Different PoKeys devices have different pins designated for E-stop so read the manual to find out which pin is used in your case. This Mach3 limit switch tutorial will cover all of them as all of the PoKeys devices are configured the same way.
E-stop
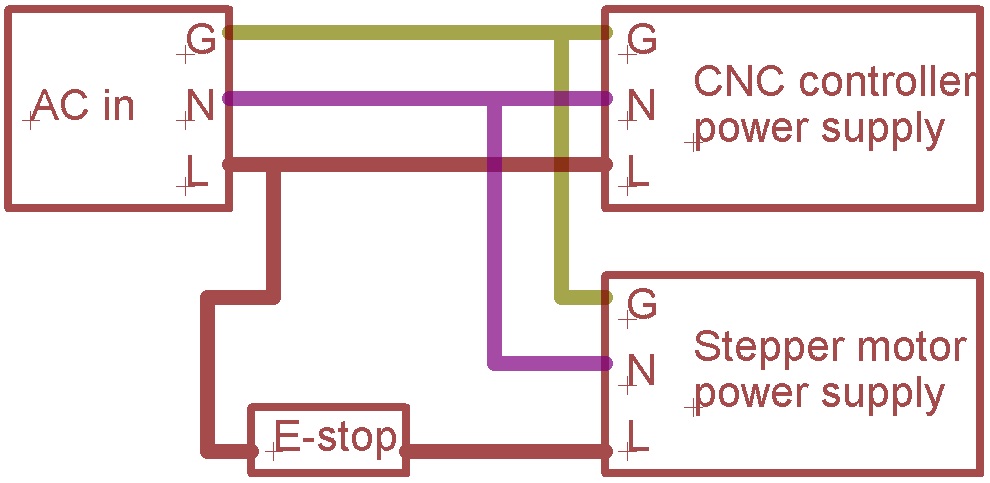
The emergency stop switch is the one that assures the safety for the operator. If this switch is pressed, the machine must not move. Also, if something goes wrong during an operation it is crucial that you have at least one in the reach of your hand. It is not uncommon that there is more than 1 E-stop on larger machines. In this case, all switches are wired in series – activating one of them will trigger the emergency stop.
The switch should lock when pressed and cut power to the machine without affecting the controller. For this case either special emergency relay or E-stop with two terminals is required, one NC (normally-closed) through which the machine is powered and one NC (normally-closed) or NO (normally-open) that signals the controller that an error occurred and the E-stop has been pressed. The E-stop should be properly wired. An example for one E-stop switch is shown below.
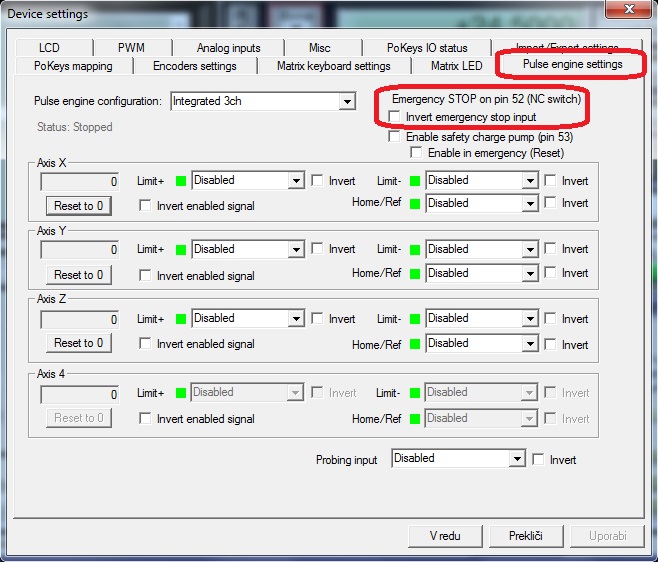
PoKeys plugin has E-stop switch mapped to the default input. In case that Mach3 shows the E-stop is pressed even if it isn’t, check the type of your E-stop switch. If you are using a NO (normally-open) switch you can go to PoKeys plugin, click on “pulse engine settings” and select “invert emergency stop input”.
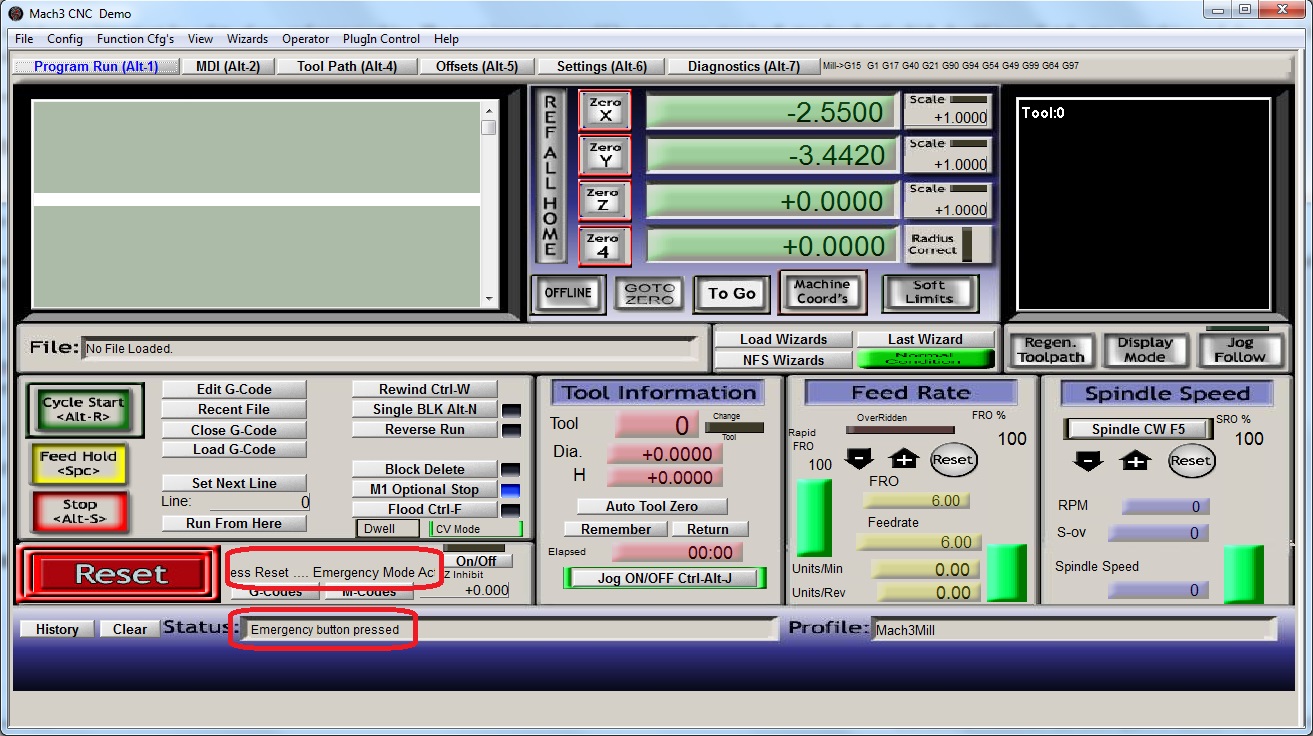
Now if you press the E-stop you should see Mach3 detect the press and you shouldn’t be able to move your machine. The ‘Reset’ button will automatically start blinking, displaying the emergency state.
Limit switches
This part will cover Mach3 limit switch configuration in a positive and negative directions. Homing switches will be covered in the next chapter.
Limit switches are not crucial for the operation of your machine but are a good safety feature to have. Although these can be to some extent replaced by soft limits, the hardware switches can prevent damage to your machine in unpredicted operation. Soft limits are machine borders determined in software and will be discussed later in this Mach3 limit switch tutorial. Even if you do have soft limits setup, limit switches will provide additional protection to your machine.
Limit switches are mounted at the ends of the machine travel, but so, that, when the machine hits the switch, it still has room to stop before crashing.
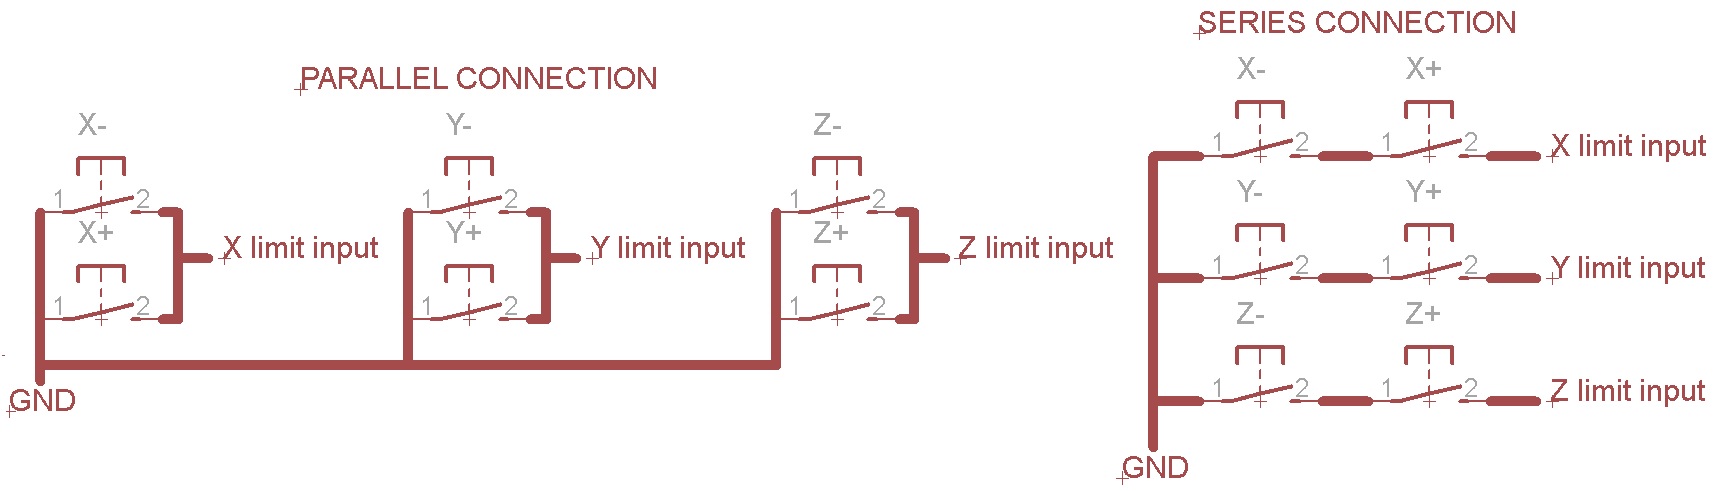
These switches can be wired in many different ways. The most common ones are to have NC switches wired in series, NO switches wired in parallel or if the controller has enough inputs, to wire each switch separately. Another option is to wire all of the switches on one input and the software will, depending on the axis moving and the direction, determine which switch was pressed, but I recommend using separate input for each axis.
An example of the two most common connections are on this picture:
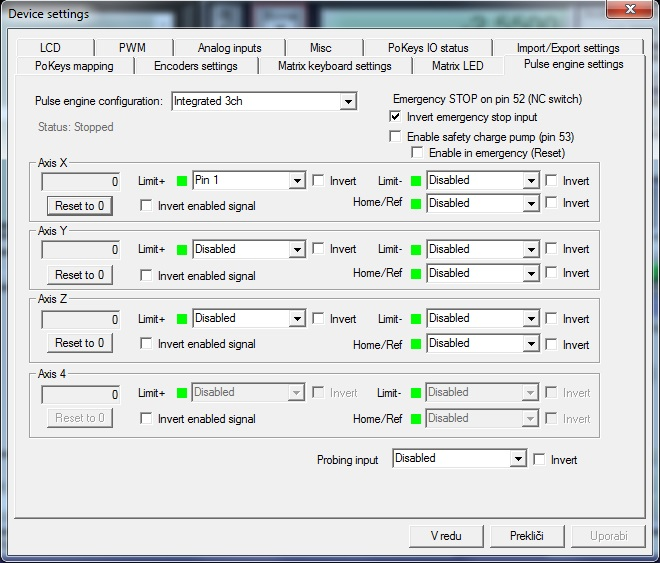
To enable limit switches in Mach3, open PoKeys plugin configuration and go to pulse engine settings. Here you can select on which pin your limit switch is connected. And if Mach3 shows that the limit switch is active, even if it is not, you have the option to invert it (if NO switches are used). When you configure the input pin, if the square is red that means that the switch is active and if it is not if should be inverted.
In this example, only X-axis was set. We used two NC switches wired in series. Since one signal is produced from such a wiring scheme, only one of the Lim+ or Lim- should be configured.
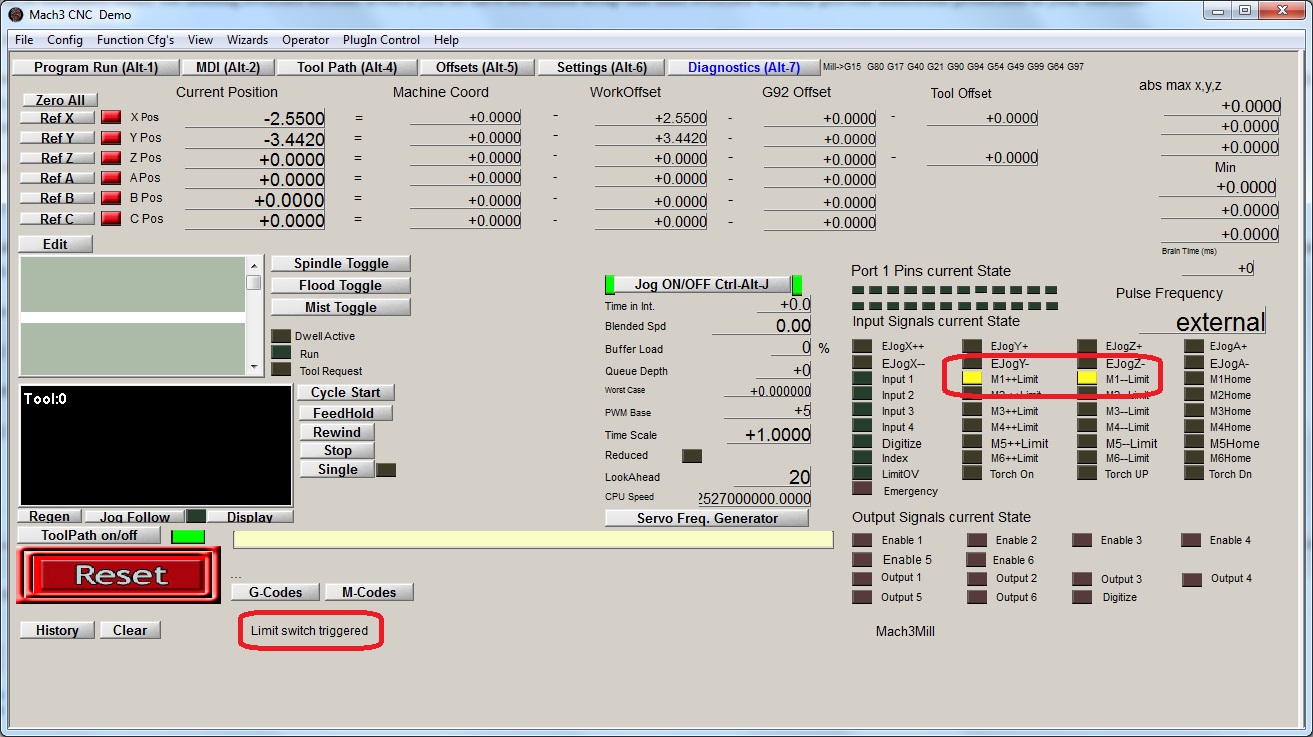
To test if your switches are working you can go to Mach3 diagnostic tab (or press Alt and 7). Here you can see if the switch is pressed or not.
Homing switches
Homing switches are a useful feature if you want your machine to constantly have the same absolute coordinates. They can be mounted anywhere on the machine and can also be shared with limit switches. To configure them follow the same steps as in the above (Limit switches) example.
Once they are set up you can home your machine. This means, that the machine will move in the specified direction until it hits the home switch (or limit switch if they are shared) and it will then know its exact location.
To setup homing procedure click on Config menu in Mach3 and then on Homing/Limits. A window will open where you will configure the procedure.

This dialog is used to configure the axis coordinate system and homing procedure. The ‘Reversed’ option inverts (reverses) the axis direction in general. Checking this will make the machine move the opposite way. By default, homing procedure starts by machine motion in negative direction (towards negative coordinates) – if positive direction is required, check the ‘Home neg.’ field. “Home Off.” sets the home switch offset. For example if your home switch would be in the middle of the machine (100mm from the edge) and you wouldn’t want to have coordinate 0 there, but 100 you would setup this value to 100. The “speed %” sets the homing speed in % of your velocity. I recommend that this value is low so the machine doesn’t accidentally crash when homing.
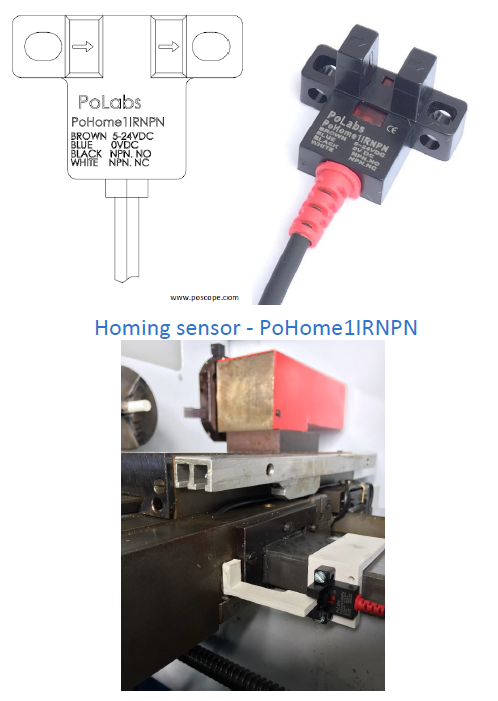
Polabs develop new homing sensor, more informations about: homing sensor.
Soft limits
Soft limits act like limit switches the only difference is, that they are defined in software (Mach3) and don’t need actual switches. It is recommended that you have homing switches properly setup before you configure the soft limits. The soft limits will only work if the machine is properly initialized (homing procedure is completed) and limits are defined.
To setup soft limits open the same Homing/Limits window as in the previous step. Then setup “soft max.” and “soft min.”. This varies from machine to machine.

If you have X0, Y0 coordinates on the lower left side of the machine and the operating area is 200×100 (X x Y) large, you would setup X max. to 200, Y max. to 100, and both minimum values to 0.
If for example your X0 and Y0 would be in the middle of the operating area, you would setup X max. to 100, Y max. to 50, X min. to -100 and Y min- to -50.
Z axis goes the same. If you have Z0 on the top and it can move for 40mm down, set Z max. to 0 and Z min. to -40.
Slow zone option is not supported by PoKeys devices.
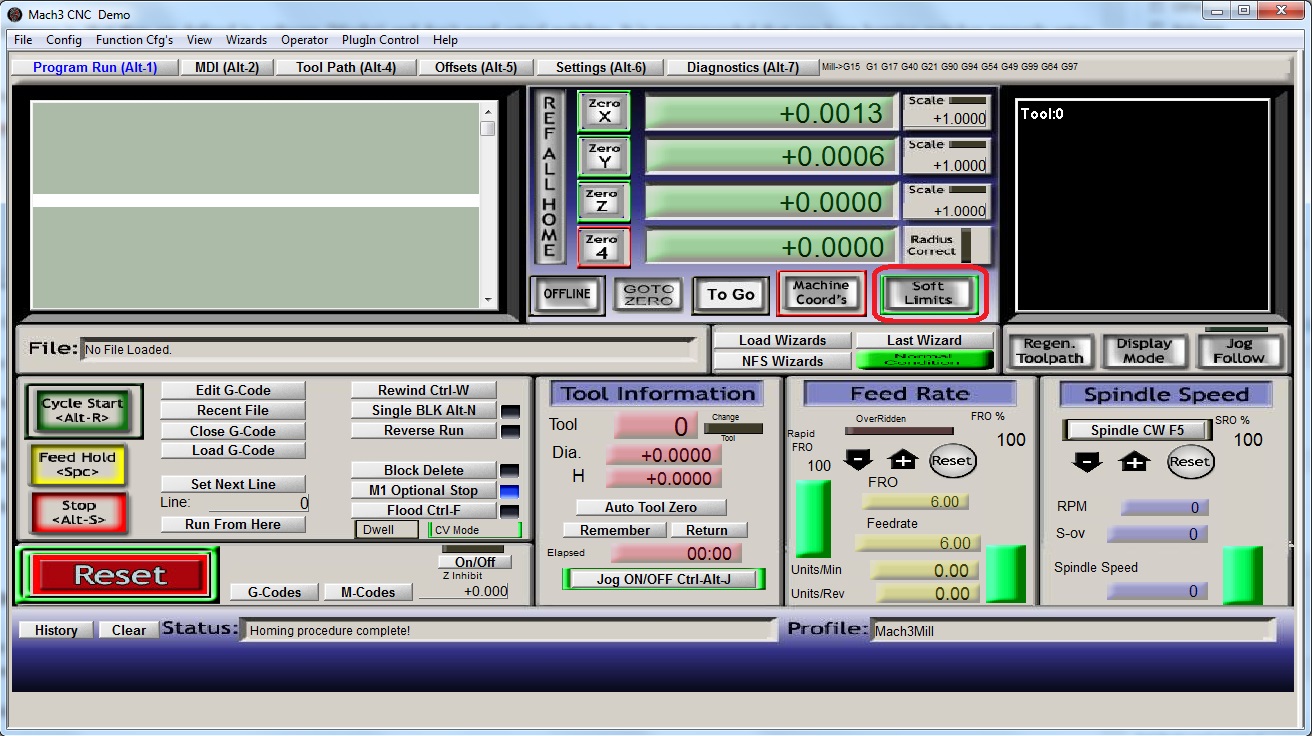
Once done, you must enable the soft limits. You can do this in the main window by clicking on the soft limits button
Testing the configuration
To test everything that you have setup in this Mach3 limit switch tutorial first make sure all of your switches are properly detected. You can see this under Mach3 diagnostic tab. When all this is working set the jogging speed to low so you can manually do the test. Be extremely careful not to crash the machine.
First test the E-stop. Slowly jog the machine, and when moving press the E-stop button. The movement should stop and you should see a notification in Mach3. Also if you still tried to jog your machine in any direction, you shouldn’t be able to do that until E-stop condition is removed. If this works you can go to the next step.
If you do have limit switches setup, slowly jog to them and when they are pressed, the machine should stop. Mach3 has a limit switch override option, found under Settings tab (Alt-6) that ignores the state of the switch. You can use this to manually jog of the switch. A safer alternative would be, to press the limit switch and try to jog. That way you are less likely to crash your machine if the switch is not detected.
To test the homing, first be prepared to press the E-stop button or Stop in Mach3. For the first time I recommend that you set the homing speed even lower. The press the “ref all home” button and the machine should move.
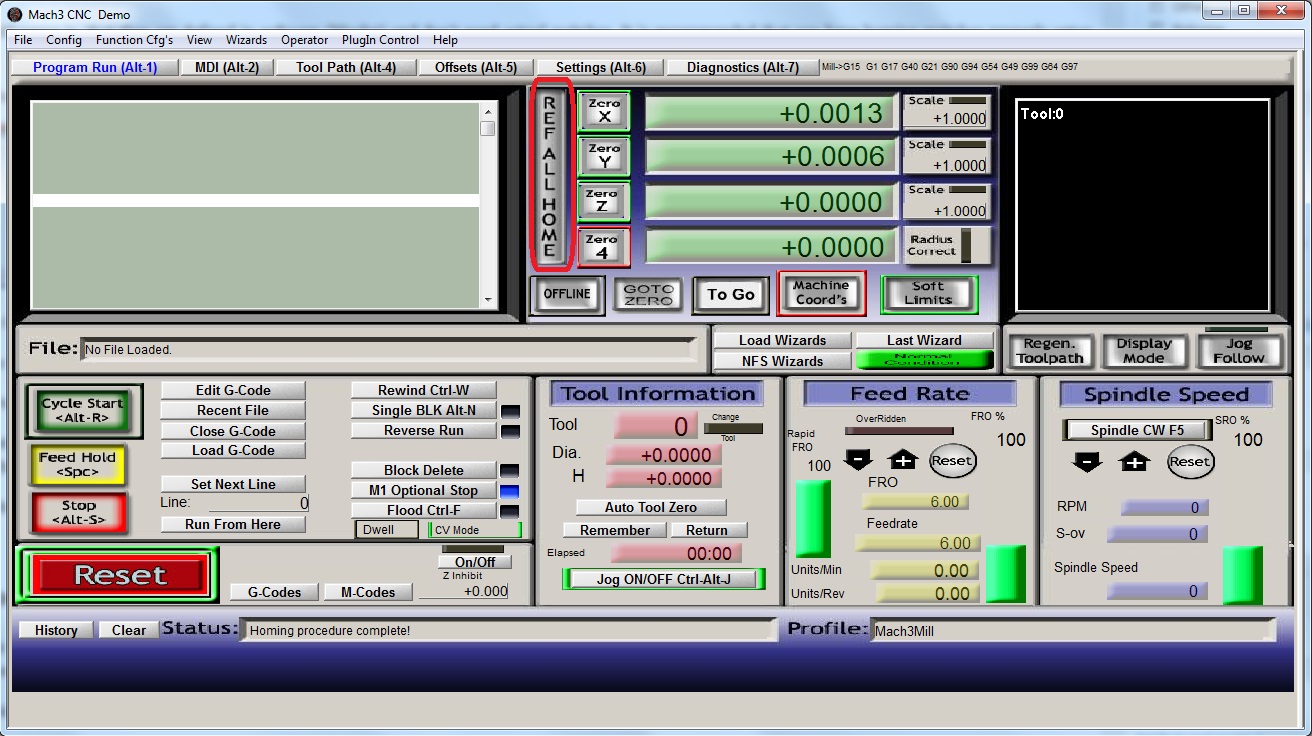
If the axis moves in the wrong direction, stop the machine and reverse the homing direction. Once the home switch is pressed the next axis should move. And once the homing is finished, you should see the right coordinates (for example 0,0,0 if you have set up the machine that way). If you don’t see the right coordinates, make sure that you are displaying absolute coordinates: the “Machine Coord’s” button on the main page (Alt-1) should have a red border.
The last step in this Mach3 limit switch tutorial is to test the soft limits. If you have setup the homing and soft limits correctly, you should not be able to jog over the virtual border. Set the jogging speed to slow and start jogging. The machine should stop once you have reached the border of the soft limits.
Conclusion
If everything was done correctly this Mach3 limit switch tutorial should finish the basics of setting up your machine. You should now have a working and safe machine for you to work on.
If you need any informations about the stepper motor driver and how to use it, we have a complete explanation of stepper motor driver.
Also, you can check the plasma voltage divider – product.
Related Posts